

I've been doing a ton of research to figure out how I can better my shop/pictures/prices/and promotions. I keep coming across people talking about how you need to have better pictures and I realize that mine are not the best. The truth is that I don't have money for a better camera. It's not really much of a camera. I paid $20 for it years ago and it eats batteries within sixty photos taken. Today I ran across someone's make shift light box and it gave me the idea to make one like this one.
I didn't want my stuff to look like they are floating like most professional light boxes make your pictures look. I wanted my items to be better lit and to appear to be in an environment. I also wanted it to look semi-artistic and not just like I took them in a studio. So I grabbed a big box that my mom had sent my birthday packages in and go to work. I cut out the bottom excess flaps and taped the top flaps together so that it was open on only one side. Then I took an exacto knife and cut a large square out of the side. Sort of like a television. I took some tape I had that is supposed to be used for making mattes for paintings and taped all the places where the light showed through. Then I got out some ancient gesso that I've had for years and watered it down and painted the entire interior almost like a white wash. The gesso didn't cover very well, probably due to old age so I then took some white acrylic paint I have and painted over it again. I used one of those sponge brushes. I moved a few months back and still haven't found where I packed all my brushes.
I then grabbed a frame off my 'creepy' wall shown in a previous post and painted that too and then dabbed it with paper towels until it looked "shabby chic". I'm not the biggest fan of "shabby chic" but I do think it looks good in this situation. I used a hair dryer to get it dry because I couldn't wait to use it. And here are the results!!


As you can see, the lighting in my apartment is terrible. I don't get home until after it's dark most days so I never get to use "natural sunlight" plus we live in a really old apartment that doesn't have any overhead lights.
I'm not sure how I'm going to light this thing. I tried using a hanging lamp but it still leaves shadows. I'm going to need those clip type lamps but I'm not sure I can afford them yet. For now, it's obvious that the pictures are far superior to my original pictures so for now it will have to do.
I'm pretty proud of it. tell me what you think :) I've also been experimenting with cropping my photos into exact squares. Apparently it helps your photos look like what you want them to look like once etsy crops them. It works like fifty percent of the time I've noticed. eh.
Some before and afters :)

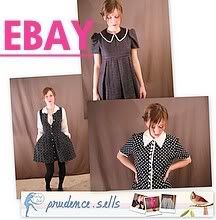
more pictures/for sale here

more pictures/for sale here

more pictures/for sale here

more pictures/for sale here

more pictures/for sale here

6 comments:
Your lightbox works really well - the pictures are fab. Thanks for the post :)
Hi!
Your pictures look way better, good job! You can eliminate the shadows by using 2 light sources, one aimed right at subject and the other to the side like you have it. Right or left side.
oh great article! thanks for sharing!
thanks for the info. i think i'll be making one soon!
Lightboxes rock! Your pictures turned out very well! I like how you composed them. :)
Wow, that really works! I need to do something similar myself as my product photos are terrible. Thanks for sharing how you did it.
Post a Comment